The Start menu, accessed with a click on the Start
button, lists the programs, folders and utility applications that are available
on your computer. The Start menu is divided into panes, with similar items
grouped on a pane. The left pane displays a list of programs that you commonly
access on the computer. This gets you going quickly if you need one of these
applications. If you use Microsoft Word consistently, it will appear on this
list. Programs that you don’t use as frequently are accessed when you point to
All Programs on the left pane.
The right pane accesses your system folders, such as
Documents, Pictures and Music. You open and adjust your system settings from
this pane, using the Control Panel. You also log off, shut down, and get help
using the right pane of the Start menu.
Below the left pane, the Search box enables you to
type keywords to complete searches for files or folders on your computer.
Searching will be covered in a later slide in this presentation.
Gadgets, such as a clock, calendar, photo slide show, headline feed, or puzzle, are added to your desktop to make it more convenient for you to use. Gadgets run constantly on your desktop. Gadgets can be selected from Windows 7 or downloaded from the Internet. Windows includes a calendar, clock, CPU meter, currency converter, headline feeds, puzzle, slide show, weather and Windows Media Center. Online you will find gadgets for many other functions, such as a Bing search, Outlook Upcoming Appointments, traffic, Google, and Yahoo.
To install a Gadget on your desktop, right-click on an empty portion of your desktop and click Gadgets. Double-click or drag a gadget to place it on your desktop. To remove a gadget from your desktop, right-click the gadget and click Close gadget.
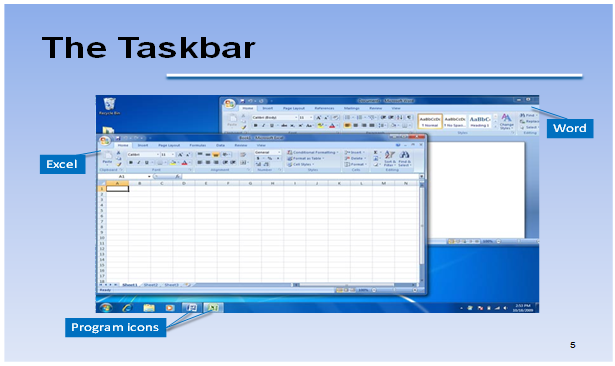
The taskbar enables you to move between open windows and provides access to the resources of your computer. Just as you can have many files and papers covering your desk, in Windows 7, you can have many applications open on your computer desktop. Using the taskbar, you activate a window that is covered by other windows by clicking the program icon. If you have used Windows in the past, it is important to note that, by default, only one program icon appears for each application that is running, not an icon for each window. For instance, if you open a cover letter and a résumé on the desktop, only one program icon─for Microsoft Word─will appear on the taskbar. If you wish to change this so that there is an application icon for each open window, right-click an open area of the taskbar, select Properties, click Never Combine on the Taskbar buttons list box, and then click OK. You may also select to combine the application icons when the taskbar is full.
The windows shown here are for Microsoft Excel and
Microsoft Word. On the taskbar, the program icons are different. To bring the
Word document to the front, simply click the Word program icon.
Aero Peek provides a preview of the window when you place your mouse pointer over the program icon. This tells you at a glance whether the item on the taskbar is the one you wish to view. When you have multiple items open in the same software, such as the résumé and cover letter, both items will be shown in the Aero Peek preview. The program icon is slightly different when multiple items of the same type are open.
In addition to the features Windows 7 automatically
includes on the taskbar, you can add toolbars to increase your productivity.
The Address toolbar appears on the taskbar in this example.
To add toolbars to the taskbar, right-click on an
open area of the taskbar, and point to Toolbars. Select the toolbar you wish to
use. A checkmark appears next to toolbars that are already active on the
taskbar. The Address toolbar is useful in accessing Internet Web pages quickly
by typing the URL or Web address into the toolbar. The Links toolbar is a way
to navigate to locations that you have set on your browser as favorites.
Software applications are pinned to the taskbar to
make them accessible with a single click, even when they are not currently
running. This saves you time since you will not have to click the Start button,
open the All Programs menu, and then select the application.
When applications are open on the desktop,
right-click the program icon on the taskbar to open the Jump List. The Jump
List contains common actions or resources for the application. Click Pin this
program to taskbar. If the application is not running, right-click the program
name on the Start menu, and click Pin to Taskbar. Pinned applications are
removed from the taskbar by right-clicking the icon and selecting Unpin this
program from the taskbar.
A related concept is pinning items to the Start
menu. Items you select to pin appear at the top of the left pane of the Start
menu. If you want quick access to Microsoft Word, pin it to the Start menu and
save yourself from having to locate it by clicking All Programs, scrolling to
the Microsoft Office folder, and then looking for Word.
Pinning items to your taskbar or Start menu really
makes the Windows 7 interface your own. It increases your productivity by
creating an environment in which you quickly find applications.
The Notification area alerts you to important
information about activities going on behind the scenes in your computer. A red
circle with an X on the notification icon indicates that a message is
available. Click the notification icon and a pop-up window displays the
information. The notification area provides information on the detection of new
devices on your computer, the availability of software updates, or recommended
maintenance and security tasks. The notification can be opened for more
information by clicking on the Open Action Center link.
The pop-up window, shown here, is a result of
clicking the Action Center icon on the taskbar. The Action Center is discussed
in a later slide of this presentation.
Just as you can rearrange the items on your desk,
you can customize your desktop to make it uniquely suited to your tastes. The
screen saver, a series of moving pictures that appears when your computer has
been idle for a period of time, along with background and window color, are
selected from the Personalization window. Right-click on an empty portion of
the desktop and select Personalize to open this window.
The Desktop Backgrounds include built-in categories
or you may select a personal picture from a folder on your computer. Many
people enjoy placing family photos or pet photos on the background of their
desktop. Likewise the screen saver, which provides privacy for your open files
on the computer when you are away from your desk, is changed with built-in
screen savers. The color of the borders of your windows is another change that
you can make to your desktop. You can mix your own colors and change the
intensity of the colors as desired. Different themes are built-in, downloaded
from online theme libraries, or created by you.
These change the desktop background, window color, sounds and screen
saver all at one time.
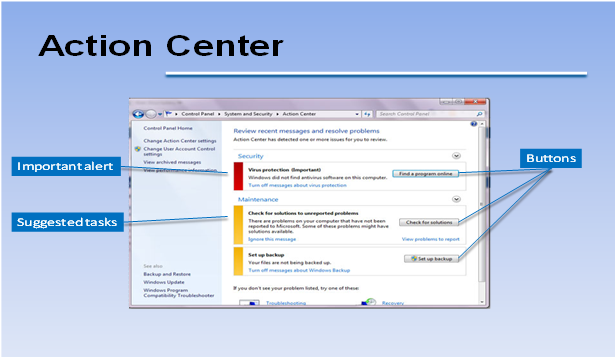
While you are using your computer, Windows 7 is
constantly monitoring your system for various maintenance and security
situations. The Action Center recommends actions when necessary. You can open
the Action Center from the Start menu, Control Panel, System and Security, and
then Action Center, or you can click the Action Center icon on the taskbar. If
the Action Center icon contains an X in a red circle, action is being
recommended. If there is no red circle, there are no actions suggested. Click
the Open Action Center link to open the Action Center window.
When actions are recommended, they are listed in the
order of severity. Red flags are serious and should be addressed. Scheduled
updates of Windows 7 are an example of red flag actions. Yellow flags are
suggestions and reminders. Maintenance suggestions, such as creating a backup,
are usually presented as yellow flags. Buttons next to the recommendations
direct you to the places to complete the procedures or to learn more about the
issue.


 DEAR STUDENT DOWNLOAD OUR LESSON HERE


